
Indulge in Deliciousness: Frozen Yogurt Berry Cheesecake Bars Recipe
Introduction
Are you ready to experience the delightful fusion of creamy cheesecake and refreshing yogurt? The Frozen Yogurt Berry Cheesecake Bars are a perfect dessert that brings together the richness of cheesecake with the lightness of yogurt. This recipe is not only a feast for the taste buds but also a visually appealing treat that can brighten up any occasion. Whether you are hosting a summer barbecue, celebrating a birthday, or simply craving something sweet, these cheesecake bars are the ideal choice.
The inspiration for these bars comes from the classic cheesecake, known for its velvety texture and indulgent flavor. However, by incorporating yogurt into the filling, we create a lighter version that doesn’t compromise on taste. With a creamy base that’s balanced by the sweetness of mixed berries, these bars offer a refreshing twist that makes them suitable for warm weather or any time you feel like indulging without the guilt.
In this article, we will guide you through the process of making Frozen Yogurt Berry Cheesecake Bars, from understanding the key ingredients to the step-by-step instructions for crafting this delicious dessert. Let’s dive into the world of flavors and textures that await you!
Understanding the Ingredients
To create the perfect Frozen Yogurt Berry Cheesecake Bars, it’s essential to understand the ingredients that contribute to their unique flavor and texture. Each component plays a vital role in ensuring that these bars are not only delicious but also satisfying.
Exploring the Crust
The crust is the foundation of any cheesecake, and for this recipe, we’ve chosen a classic graham cracker crust. Here’s a closer look at its components:
– Graham Cracker Crumbs: These crumbs form the base of the crust, providing a sweet and slightly crunchy texture that complements the creamy filling. Their subtle sweetness enhances the overall flavor of the bars.
– Granulated Sugar: Added to the crust, sugar enhances its sweetness, ensuring that each bite of the dessert is perfectly balanced. It also contributes to the slight caramelization that occurs during baking, adding depth to the flavor.
– Unsalted Butter: The butter acts as a binding agent for the crust, helping to hold the crumbs together while imparting a rich taste. Using unsalted butter allows you to control the saltiness of the final product, ensuring a harmonious flavor profile.
Analyzing the Filling
The filling is what truly sets these cheesecake bars apart. It’s creamy, flavorful, and packed with nutrients. Here’s what goes into this delectable filling:
– Plain Greek Yogurt: This ingredient is the star of the show, providing a creamy texture with a tangy flavor. Greek yogurt is lower in fat than traditional cream cheese, making it a healthier alternative without sacrificing that rich cheesecake taste.
– Cream Cheese: To achieve the classic cheesecake flavor, cream cheese is included in the filling. It adds richness and creaminess, creating a beautiful balance with the tangy yogurt.
– Sugar: Just like in the crust, sugar sweetens the filling and enhances the overall dessert experience. It’s crucial to use the right amount to ensure the filling is not overly sweet, allowing the natural flavors of the berries to shine through.
– Vanilla Extract: A splash of vanilla extract elevates the flavor profile, adding an aromatic essence that complements both the yogurt and cream cheese. It brings warmth and depth to the filling.
– Mixed Berries: Fresh or frozen mixed berries not only infuse the filling with vibrant color but also contribute natural sweetness and a burst of flavor. Blueberries, strawberries, raspberries, or blackberries can all be used, allowing you to customize the bars to your liking.
The Topping: A Final Touch
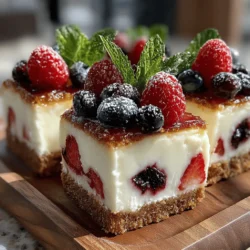
To add a touch of elegance and freshness to the bars, we recommend garnishing them with fresh berries and mint. This not only enhances the visual appeal but also provides a refreshing contrast to the creamy filling. The bright colors of the berries and the vibrant green of the mint create an inviting presentation that will entice your guests.
Step-by-Step Instructions
Now that you have a thorough understanding of the ingredients, let’s move on to the exciting part—making your Frozen Yogurt Berry Cheesecake Bars! Follow these step-by-step instructions to create a dessert that is sure to impress.
Preparing the Crust
1. Gather Your Ingredients: Start by gathering the graham cracker crumbs, granulated sugar, and unsalted butter. This will ensure that you have everything on hand for an efficient preparation process.
2. Preheat the Oven: Preheat your oven to 350°F (175°C). This step is crucial as it prepares the environment for the crust to bake evenly.
3. Mix the Ingredients: In a medium-sized mixing bowl, combine the graham cracker crumbs and granulated sugar. Stir until the sugar is evenly distributed throughout the crumbs.
4. Add the Butter: Melt the unsalted butter in a microwave-safe bowl or on the stove. Once melted, pour it into the bowl with the graham cracker mixture. Use a fork or spatula to mix until all the crumbs are evenly coated and the mixture resembles wet sand.
5. Press the Crust into the Pan: Line an 8×8-inch baking dish with parchment paper for easy removal later. Pour the crumb mixture into the prepared pan and press it firmly into the bottom using the back of a measuring cup or your fingertips. Ensure an even layer across the bottom.
6. Bake the Crust: Place the crust in the preheated oven and bake for 8-10 minutes, or until golden brown. Keep an eye on it to prevent burning. Once done, remove it from the oven and let it cool while you prepare the filling.
With the crust prepared and cooling, you’re one step closer to enjoying your delicious Frozen Yogurt Berry Cheesecake Bars. Next, we will move on to creating the creamy filling that will make these bars truly unforgettable. Stay tuned!
{{image_2}}
Creating your own frozen yogurt berry cheesecake bars at home is a rewarding experience, combining the creamy richness of cheesecake with the refreshing notes of yogurt and berries. In this segment, we will cover the essential steps to assemble and freeze your cheesecake bars, along with tips for presentation, nutritional benefits, and mindful serving suggestions.
Instructions for Beating the Cream Cheese and Incorporating the Yogurt and Other Filling Ingredients
To start crafting the creamy filling for your cheesecake bars, you will need to beat the cream cheese. Here’s how to do it effectively:
1. Soften the Cream Cheese: Ensure your cream cheese is at room temperature for easier blending. Leave it out for about 30 minutes before starting.
2. Beat the Cream Cheese: In a large mixing bowl, use an electric mixer to beat the softened cream cheese until it’s smooth and creamy, typically around 2-3 minutes. This step is crucial as it eliminates lumps, resulting in a silky texture.
3. Add the Greek Yogurt: Gradually incorporate the Greek yogurt into the cream cheese mixture while mixing at low speed. This helps to blend the ingredients without splattering. Continue mixing until the yogurt is fully combined, creating a smooth and creamy base.
4. Incorporate Sweeteners and Flavorings: Next, add your sweetener (such as honey or maple syrup) and any flavorings like vanilla extract. Beat the mixture until it is fully combined, ensuring the sweetness is evenly distributed throughout the filling.
By thoroughly blending the cream cheese and yogurt, you’re setting the stage for a luscious cheesecake filling that will complement the tartness of the berries beautifully.
Folding in the Berries
Once your creamy mixture is ready, it’s time to add the berries. This step is crucial and should be done with care:
– Choose Fresh Berries: Use fresh strawberries, blueberries, raspberries, or a mix for vibrant flavor and color. Wash them thoroughly and pat them dry to remove excess moisture.
– Gently Fold the Berries: Using a spatula, gently fold the berries into the cheesecake filling. Be careful not to overmix; the goal is to maintain the integrity of the berries and prevent them from completely breaking down. A gentle folding technique helps preserve their shape and texture, adding delightful bursts of flavor in each bite.
Assembling the Bars
With the filling prepared and the berries folded in, it’s time to assemble your cheesecake bars:
1. Spoon the Filling Over the Crust: After your crust has cooled, take the prepared filling and spoon it over the crust evenly. Use a spatula to spread it out gently across the surface, ensuring it reaches the edges for a neat finish.
2. Create a Smooth Surface: To achieve a smooth, even layer of filling, use the back of the spatula or a bench scraper. This step is important not only for aesthetics but also for ensuring an even freeze and easier serving later.
3. Optional Topping: If desired, sprinkle some extra berries on top of the filling or a light dusting of graham cracker crumbs for added texture and visual appeal.
Freezing and Serving
Freezing your cheesecake bars properly is key to achieving the best texture and flavor:
– Freeze the Bars: Cover the assembled cheesecake bars with plastic wrap or aluminum foil. Place them in the freezer for at least 4-6 hours, or until they are completely frozen. For best results, let them freeze overnight.
– Serving the Bars: Once frozen, remove the bars from the freezer and let them sit at room temperature for about 10-15 minutes to soften slightly. This makes cutting easier and enhances the creamy texture.
– Cutting the Bars: Use a sharp knife to cut the cheesecake into squares or rectangles. Cleaning the knife between cuts with a damp cloth can help ensure clean edges.
Presentation Ideas
Beautiful presentation can elevate your dessert experience, making it more appealing for gatherings:
– Plating Suggestions: Arrange the bars on a serving platter, leaving some space between them. This allows guests to easily pick them up without disturbing the others.
– Add Garnishes: Consider garnishing the cheesecake bars with fresh mint leaves or additional berries. A drizzle of honey or a light sprinkle of powdered sugar can also add a touch of elegance.
– Chilled Serving Platter: For an impressive display, serve your bars on a chilled platter. This helps keep them frozen longer and adds a professional touch.
Creating an Eye-Catching Display
An attractive presentation will impress your guests and enhance their enjoyment:
– Layering: If serving at a gathering, layer the bars with different fruits or sauces. A layer of berry compote or fruit coulis beneath the cheesecake bars can add color and flavor.
– Decorative Touches: Consider using a piping bag to add a decorative swirl of whipped cream on the side or on top of the bars. This simple addition can elevate the visual appeal.
– Serving Utensils: Use elegant serving utensils, such as a cake server or decorative tongs, to make it easy for guests to serve themselves while adding to the overall presentation.
Nutritional Benefits of the Ingredients
Understanding the nutritional advantages of the ingredients in your cheesecake bars allows you to enjoy them guilt-free:
Greek Yogurt and Its Benefits
Greek yogurt is not only a key ingredient in this recipe but also packs a nutritional punch:
– High in Protein: Greek yogurt is an excellent source of protein, which helps in muscle repair and growth. It can also promote satiety, making you feel fuller for longer.
– Rich in Probiotics: The live cultures in Greek yogurt support digestive health, promoting a balanced gut microbiome.
– Calcium Source: This ingredient is also rich in calcium, essential for bone health and muscle function.
The Role of Berries in Nutrition
Berries are not only delicious but also incredibly nutritious:
– Antioxidant Powerhouses: Berries are packed with antioxidants, helping to combat oxidative stress and inflammation in the body.
– Vitamins and Fiber: They are a great source of vitamins C and K, and their fiber content aids in digestion and helps maintain a healthy weight.
– Low in Calories: Most berries are low in calories, making them an ideal addition to any dessert without guilt.
Understanding Portion Control
While these cheesecake bars are a healthier alternative to traditional desserts, portion control is key:
– Recommended Serving Size: Aim for a serving size of about 2-3 squares, depending on their size. This allows you to enjoy the flavors without overindulging.
– Mindful Eating: Pay attention to your hunger cues and enjoy each bite. Eating mindfully can enhance your experience and help prevent overeating.
Conclusion
Frozen Yogurt Berry Cheesecake Bars are not only a delicious and refreshing dessert but also a healthier alternative to traditional cheesecake. By combining Greek yogurt, cream cheese, and fresh berries, this recipe offers a delightful way to satisfy your sweet cravings without the guilt. Whether enjoyed as an everyday treat or a special occasion dessert, these bars are sure to become a favorite in your recipe collection. Embrace the joy of homemade desserts and the delightful flavors that come with them. So gather your ingredients, follow these steps, and indulge in a delightful dessert that’s as good for you as it is satisfying!