
Chicken tenders are a beloved dish that transcends age and occasion, making them a staple in many households. Their tender meat and crispy exterior create a delightful combination that appeals to both children and adults alike. Whether served as a quick weeknight dinner, a party snack, or a fun meal for the family, chicken tenders remain a consistent crowd-pleaser. This Golden Crunch Chicken Tenders recipe elevates the classic dish with a few unique twists, promising an unforgettable crunch and flavor that sets it apart from your average tender.
One of the standout features of this recipe is the use of buttermilk for marinating the chicken. This simple yet effective ingredient not only infuses the meat with flavor but also tenderizes it, resulting in a juicier bite. Coupled with a coating of panko breadcrumbs and Parmesan cheese, the tenders achieve an exceptional crunch that is both satisfying and addictive. This combination allows for a flavorful crust that locks in the moisture of the chicken, ensuring each tender is as delicious as the last.
Homemade chicken tenders, particularly this Golden Crunch version, offer unparalleled versatility. They can be served with a variety of dipping sauces, paired with salads, or enjoyed as a stand-alone snack. This adaptability means that they are perfect for casual family dinners, festive gatherings, or even as a comforting late-night snack. With the right approach, you can create a dish that is not only tasty but also tailored to your preferences.
The Appeal of Homemade Chicken Tenders
Creating chicken tenders from scratch provides several advantages over store-bought options. First and foremost, you have complete control over the ingredients, ensuring both freshness and flavor. Store-bought tenders often contain preservatives and additives that can compromise the taste and nutritional value of the dish. By preparing chicken tenders at home, you can select high-quality ingredients and avoid unwanted chemicals.
Moreover, making chicken tenders from scratch allows you to customize the recipe to suit your taste. Whether you prefer a spicier kick or a milder flavor, you can easily adjust the seasonings and marinades. This flexibility not only enhances your cooking skills but also adds an element of creativity to your culinary endeavors.
Another significant benefit of preparing food at home is the satisfaction that comes from crafting a meal from start to finish. The process of marinating, coating, and baking or frying the chicken tenders can be a rewarding experience, leading to a sense of accomplishment when you serve a beautifully cooked dish to family and friends. The joy of sharing your homemade creations amplifies the overall pleasure of cooking, making it an enjoyable and fulfilling activity.
Ingredients Overview
To create the perfect Golden Crunch Chicken Tenders, it’s essential to gather the right ingredients. Here is a detailed breakdown of the key components that contribute to the dish’s deliciousness:
– Chicken: For this recipe, boneless, skinless chicken breasts are the ideal choice. They provide tenderness and are easy to work with, ensuring that the final product is juicy and flavorful. When selecting chicken, look for fresh, high-quality cuts to elevate your dish.
– Marinade: The star of the marinade is buttermilk, which plays a crucial role in infusing flavor and enhancing tenderness. Buttermilk’s acidity helps break down proteins in the chicken, resulting in a more succulent texture. Alongside the buttermilk, a blend of spices such as garlic powder, onion powder, paprika, and salt can be added to boost the flavor profile.
– Coating: The combination of all-purpose flour, panko breadcrumbs, Parmesan cheese, and Italian seasoning creates the signature golden crunch. Panko breadcrumbs, known for their airy and crispy texture, are essential for achieving that satisfying crunch. The addition of Parmesan cheese not only enhances the flavor but also contributes to a beautifully browned crust when cooked.
– Dipping Sauce: While the chicken tenders are delicious on their own, a complementary dipping sauce can elevate the entire experience. A simple mixture of mayonnaise, Dijon mustard, honey, and a splash of lemon juice makes for a tangy and sweet sauce that pairs perfectly with the crispy tenders.
Step-by-Step Preparation Process
Marinating the Chicken
To kick off your journey to Golden Crunch Chicken Tenders, start with the marination process. This crucial step allows the chicken to absorb flavors and become incredibly tender. Here’s how to do it effectively:
1. Prepare the Marinade: In a large bowl, combine buttermilk with your chosen spices. For a classic flavor, consider adding garlic powder, onion powder, paprika, and a generous pinch of salt. Whisk the ingredients together until well mixed.
2. Add the Chicken: Cut the boneless, skinless chicken breasts into strips or tender-sized pieces. This will ensure even cooking and make them easier to handle. Place the chicken pieces into the buttermilk marinade, making sure each piece is fully submerged.
3. Marinate: Cover the bowl with plastic wrap or a lid and refrigerate for at least 1 hour, or ideally overnight. The longer the chicken marinates, the more flavorful and tender it will become. If you’re short on time, a 30-minute marination can still yield delicious results.
Preparing the Coating
Once your chicken has marinated to perfection, it’s time to prepare the coating that will give your tenders their iconic crunch.
1. Set Up Your Breading Station: Create a three-part breading station with three shallow dishes. In the first dish, place all-purpose flour seasoned with a bit of salt and pepper. In the second dish, whisk together eggs and a splash of water to create an egg wash. In the third dish, combine panko breadcrumbs, grated Parmesan cheese, and Italian seasoning.
2. Coat the Chicken: Begin the breading process by removing a piece of chicken from the marinade, allowing any excess buttermilk to drip off. Dredge it in the flour, ensuring it’s fully coated. Next, dip the floured chicken into the egg wash, allowing any excess to drip off before finally coating it with the panko mixture. Press gently to ensure the breadcrumbs adhere well.
3. Repeat: Continue this process for all the chicken pieces, placing the breaded tenders on a baking sheet lined with parchment paper. This will make transferring them to the cooking surface easier later on.
By following these initial steps, you’re well on your way to creating mouthwatering Golden Crunch Chicken Tenders that will impress everyone at your table. Stay tuned for the next section, where we will explore the cooking methods and tips to achieve that perfect golden finish!
{{image_2}}
Coating the Chicken
Coating your chicken tenders properly is essential for achieving that signature crunch. The key lies in the flour and breadcrumb mixtures, which should be well-seasoned to enhance the flavor of the chicken. Start by preparing your flour mixture. In a shallow bowl, combine all-purpose flour with salt, pepper, garlic powder, and paprika. The garlic powder adds a savory depth, while paprika gives a subtle smokiness and vibrant color.
Next, prepare your breadcrumb mixture. Use panko breadcrumbs for an extra crunch. Mix the panko with grated Parmesan cheese, dried oregano, and a pinch of cayenne pepper for a hint of heat. This combination not only adds flavor but also creates a golden crust that is visually appealing.
Tips for Keeping the Coating Light and Crispy While Baking
To ensure that your coating stays light and crispy, avoid overloading the chicken strips with the flour and breadcrumb mixtures. When you coat the chicken, tap off any excess flour before moving to the breadcrumb bowl. This prevents the coating from becoming too heavy and soggy during baking. Additionally, consider using a spray bottle filled with cooking oil to lightly mist the coated chicken tenders before baking. This will help achieve a beautifully golden finish without frying.
Step-by-Step Guide on How to Effectively Coat the Chicken Strips
1. Prep the Chicken: Start with clean, dry chicken tenders. Pat them down with paper towels to remove excess moisture, which can prevent the coating from adhering properly.
2. Dredge in Flour: Take a chicken tender and first dip it into the seasoned flour mixture. Ensure that all surfaces are coated. Move it gently to avoid tearing.
3. Egg Wash: After flouring, dip the chicken strip into the egg wash. This layer acts as glue for the breadcrumb coating, ensuring it sticks well.
4. Coat with Breadcrumbs: Finally, press the chicken tender into the breadcrumb mixture. Make sure to cover all sides, pressing gently to help the crumbs adhere.
5. Visual Cues: Look for an even coating without any bare spots. The chicken should appear well-covered, with a light layer of breadcrumbs clinging to it. This indicates that you have successfully coated the tender for optimal crunch.
Baking the Tenders
Baking your chicken tenders requires attention to temperature and timing. Preheat your oven to 425°F (220°C). A hot oven is crucial for achieving that crispy exterior while keeping the chicken juicy inside.
Instructions on Baking Time and Checking for Doneness
Arrange the coated chicken tenders on a baking sheet lined with parchment paper or a silicone baking mat. Make sure to space them out evenly to allow hot air to circulate around each piece. Bake for about 15-20 minutes, flipping halfway through for even cooking.
To check for doneness, use a meat thermometer; the internal temperature should reach 165°F (75°C). If you don’t have a thermometer, check that the juices run clear when the thickest part of the chicken is pierced with a fork.
Creating the Perfect Dipping Sauce
A great dipping sauce can elevate your Golden Crunch Chicken Tenders to a whole new level. A classic honey mustard sauce pairs beautifully with the tenders, balancing the savory crunch with a hint of sweetness.
Detailed Instructions on How to Prepare the Dipping Sauce
1. Base Ingredients: In a small bowl, combine ½ cup of mayonnaise, 2 tablespoons of honey, and 2 tablespoons of Dijon mustard. Mix well until smooth.
2. Adjusting Flavors: Taste the sauce and adjust according to your preference. If you prefer a sweeter sauce, add more honey. For a tangier kick, incorporate a bit more mustard. A dash of lemon juice can also brighten up the flavors.
3. Whisk and Serve: Whisk everything together until well combined, then refrigerate for at least 15 minutes. This allows the flavors to meld beautifully. Serve it chilled alongside your chicken tenders for a delightful contrast.
Serving Suggestions
Your Golden Crunch Chicken Tenders can be enjoyed in various ways, making them perfect for any occasion. Here are some serving suggestions to enhance your dining experience:
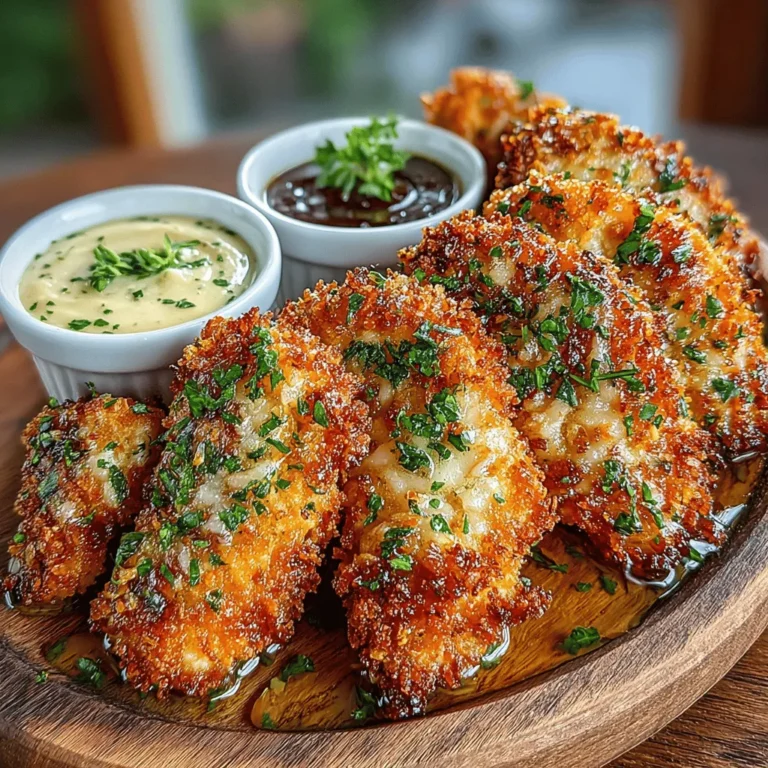
1. Plating Options: Arrange the chicken tenders on a large platter, garnished with fresh parsley or lemon wedges for a pop of color.
2. Side Dish Pairings: Consider serving these tenders with classic sides like crispy French fries, coleslaw, or a fresh garden salad. For a healthier option, pair them with steamed vegetables or quinoa.
3. Meal Settings: These tenders are versatile enough for casual family dinners, game day gatherings, or even as a party appetizer. You can set up a dipping station with a variety of sauces, like ranch, BBQ, and sriracha, to cater to different taste preferences.
Nutritional Information
When prepared with care, Golden Crunch Chicken Tenders can be a nutritious addition to your meal plan.
– Nutritional Benefits: Chicken is an excellent source of protein, essential for muscle growth and repair. The use of whole grains in panko breadcrumbs adds fiber to your diet, contributing to overall digestive health.
– Portion Sizes: A typical serving size is about 3-4 tenders, depending on your appetite and accompanying sides. Pairing with a salad or vegetables can help you create a balanced meal that is satisfying without being overly indulgent.
Conclusion
Making homemade Golden Crunch Chicken Tenders is a rewarding experience that leads to a delicious meal the entire family can enjoy. The process of preparing, coating, and baking these tenders not only fills your kitchen with mouthwatering aromas but also provides a sense of accomplishment.
We encourage you to try this recipe at home and experience the delightful crunch and flavor of your very own chicken tenders. With their versatility, they can easily become a staple in your weekly rotation, whether for a quick dinner or a festive gathering. Embrace the joy of cooking and the satisfaction of serving up a dish that everyone will love, turning ordinary mealtime into a cherished family moment.
