Chilly Strawberry Bliss Bars: A Refreshing Delight for Any Occasion
Introduction
As the warm days of summer approach, the craving for refreshing and satisfying treats becomes irresistible. Finding a dessert that perfectly balances indulgence with health can often feel like a daunting task. However, the Chilly Strawberry Bliss Bars offer a delightful solution, merging flavor with a lightness that does not compromise your dietary goals. This dessert is not only a feast for the eyes with its vibrant colors but also a delicious way to enjoy the bounty of fresh strawberries, making it a perfect addition to any gathering.
The Chilly Strawberry Bliss Bars are a harmonious blend of luscious strawberries layered atop a soft, delectable cake base, all crowned with a light and airy whipped topping. This recipe captures the essence of summer, making it an ideal treat for picnics, birthday parties, or just a sweet end to a family dinner. The versatility of this dessert is truly remarkable, as it can easily cater to various dietary preferences, allowing everyone to indulge without guilt.
In this article, we will explore the ingredients that create the magic of Chilly Strawberry Bliss Bars, and guide you step-by-step through the initial phases of crafting this heavenly dessert. Whether you’re a seasoned baker or a novice in the kitchen, you’ll find that creating these blissful bars is both simple and rewarding.
Understanding the Ingredients
The foundation of any great recipe lies in its ingredients, and the Chilly Strawberry Bliss Bars are no exception. Each component plays a crucial role in developing the flavor and texture that makes this dessert so special. Let’s take a closer look at the key ingredients that come together to create this refreshing treat.
Exploring the Strawberry Layer
At the heart of the Chilly Strawberry Bliss Bars is the strawberry layer, which is undeniably the star of the show. This layer is designed to highlight the natural sweetness and vibrant color of fresh strawberries, allowing their flavor to shine through.
– Fresh Strawberries: The primary ingredient in this dessert, fresh strawberries provide a burst of sweetness and a stunning hue that brightens up the bars. When selecting strawberries, look for ones that are ripe and fragrant, as they will contribute the most flavor to the dish.
– Honey or Maple Syrup: To enhance the natural sweetness of the strawberries, honey or maple syrup can be added. These natural sweeteners not only elevate the flavor but also allow for a vegan adaptation, ensuring that everyone can enjoy this treat.
– Fresh Lemon Juice: A splash of fresh lemon juice adds a hint of acidity that beautifully balances the sweetness of the strawberries. This citrus element brings a refreshing brightness to the layer, making each bite invigorating.
– Cornstarch: Acting as a thickening agent, cornstarch is essential for creating a luscious strawberry mixture. When combined with the strawberries, it helps to achieve a syrupy consistency that holds together perfectly when layered in the bars.
Decoding the Cake Layer
Beneath the strawberry layer lies the cake layer, which provides a soft and inviting base for the dessert. This layer is designed to be light yet flavorful, complementing the strawberries without overpowering them.
– All-Purpose Flour: The foundation of the cake layer, all-purpose flour provides the necessary structure to the bars. It acts as the backbone, ensuring that the bars hold their shape when cut and served.
– Granulated Sugar: While the strawberries bring their own sweetness, granulated sugar adds a touch of sweetness to the cake layer. It helps balance the flavors and allows the strawberry layer to shine through.
– Baking Powder and Salt: These two ingredients are essential for leavening the cake, creating a light and airy texture. Baking powder helps the cake rise, while a pinch of salt enhances the overall flavor profile.
– Unsalted Butter or Coconut Oil: For richness and moisture, unsalted butter or coconut oil can be used in the cake batter. Both options add depth to the flavor, with coconut oil providing a subtle tropical note.
– Egg or Flaxseed Egg: To bind the ingredients together, an egg or a flaxseed egg can be incorporated into the batter. This flexibility allows those adhering to a vegan diet to easily modify the recipe while still achieving the desired texture.
– Vanilla Extract and Milk: Finally, a splash of vanilla extract and milk enhances the overall flavor and moisture of the cake layer. The vanilla adds warmth, while the milk ensures that the batter reaches the perfect consistency.
The Whipped Topping
No dessert is complete without a luscious topping, and the Chilly Strawberry Bliss Bars are adorned with a rich and fluffy whipped topping that takes them to the next level.
– Heavy Whipping Cream or Coconut Cream: The base of the whipped topping can be heavy whipping cream or coconut cream for a dairy-free option. Both create a decadent and airy layer that beautifully contrasts with the dense cake and fruity strawberry filling.
– Powdered Sugar: To sweeten the whipped cream to perfection, powdered sugar is added. This fine sugar dissolves quickly, ensuring a smooth and creamy topping that complements the other layers of the bars.
With a clear understanding of the ingredients and their roles in the Chilly Strawberry Bliss Bars, you are now ready to embark on the journey of creating this delightful dessert. In the following sections, we will dive into the step-by-step instructions, guiding you through the process of assembling and baking these blissful bars, ensuring that you can serve up this refreshing treat with confidence and flair.
{{image_2}}
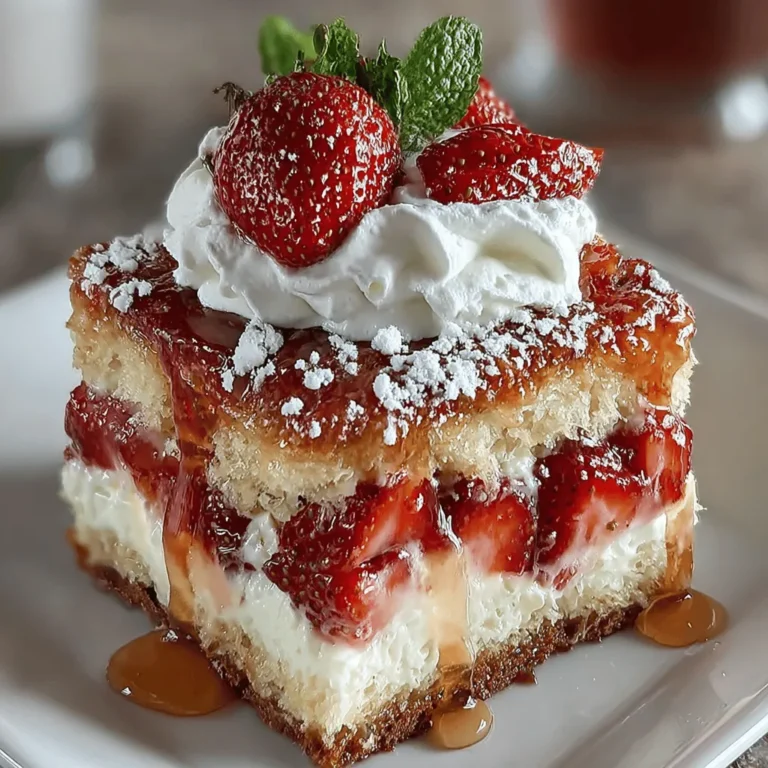
Chilly Strawberry Bliss Bars are a delightful treat that combines vibrant strawberries, moist cake, and a fluffy whipped cream topping. These bars are perfect for warm days and festive gatherings, delivering a refreshing burst of flavor in every bite. Let’s explore the step-by-step instructions for creating this luscious dessert, along with tips for serving and presentation.
Step-by-Step Instructions
Creating these blissful bars is a straightforward process that anyone can master with the right guidance. Here’s how to make them from scratch.
Preparing the Strawberry Layer
1. Cook the Strawberries: Begin by washing and hulking 2 cups of fresh strawberries. Chop them into small pieces and place them in a medium saucepan over medium heat.
2. Add Sweetness and Flavor: To the strawberries, add 1/4 cup of honey, the juice of half a lemon, and 1 tablespoon of cornstarch. The honey sweetens the strawberries while the lemon juice enhances their natural flavor.
3. Thicken the Mixture: Stir the ingredients gently until the mixture begins to bubble. Let it cook for about 5-7 minutes, stirring occasionally until it thickens to a jam-like consistency. Once thickened, remove the saucepan from heat and let it cool slightly.
This step encapsulates the essence of the strawberries, ensuring they shine in the final product.
Making the Cake Layer
1. Preheat the Oven: While the strawberry layer cools, preheat your oven to 350°F (175°C) and line an 8×8 inch baking dish with parchment paper, leaving a bit of overhang for easy removal later.
2. Combine Dry Ingredients: In a mixing bowl, whisk together 1 cup of all-purpose flour, 1 teaspoon of baking powder, and a pinch of salt. This mixture provides the structure for your cake.
3. Mix Wet Ingredients: In another bowl, beat together 1/4 cup of melted butter, 1/2 cup of sugar, and 1 large egg until well combined. Add 1 teaspoon of vanilla extract for a fragrant note.
4. Combine Wet and Dry: Gradually add the dry ingredients to the wet mixture, stirring until just combined. Be careful not to overmix; this will ensure a tender cake that complements the strawberry layer beautifully.
Assembling the Layers
1. Pour the Cake Batter: Carefully pour the cake batter into the prepared baking dish. Use a spatula to spread it evenly across the bottom. This layer will serve as the base for your strawberry filling.
2. Add the Strawberry Layer: Spoon the cooled strawberry mixture over the cake batter, spreading it evenly to cover the entire surface. This meticulous assembly ensures each bite contains a perfect balance of cake and strawberries.
Baking the Layered Cake
1. Bake: Place the assembled dish in the preheated oven and bake for 25-30 minutes or until a toothpick inserted in the center comes out clean. Keep a watchful eye on the cake to avoid overbaking, which can lead to a dry texture.
2. Cool Completely: Once baked, remove the dish from the oven and set it on a wire rack. Allow the cake to cool completely in the pan. This step is crucial for achieving the right texture and flavor.
Preparing the Whipped Cream Topping
1. Whip the Cream: In a large mixing bowl, pour in 1 cup of heavy whipping cream. Using an electric mixer, beat the cream on medium speed until soft peaks form.
2. Sweeten the Whipped Cream: Gradually add 2 tablespoons of powdered sugar and a splash of vanilla extract, then continue whipping until stiff peaks form. This will result in a light and airy topping that enhances the overall dessert experience.
Layering and Freezing
1. Spread the Whipped Cream: Once the cake is completely cool, carefully spread the whipped cream topping over the strawberry layer. Use a spatula to create an even, smooth surface.
2. Freeze: Cover the baking dish with plastic wrap and place it in the freezer. Allow the bars to freeze for at least 4 hours or until the topping is firm. This step transforms the dessert into a refreshing treat, ideal for warm days.
Serving the Bars
1. Cut into Squares: Once frozen, remove the dish from the freezer. Allow the bars to sit at room temperature for about 5-10 minutes before slicing. This brief time at room temperature allows for easier slicing, ensuring a clean presentation.
2. Serve: Cut the bars into squares or rectangles, depending on your preference. Serve them on a decorative platter for an appealing presentation.
Presentation Ideas
To elevate the dessert’s visual appeal, consider these presentation ideas:
– Garnish: Top each bar with fresh strawberries and mint leaves for a touch of color and freshness. The berries add a delectable look and a hint of extra flavor.
– Decorative Platter: Arrange the bars on a beautiful serving platter. A white or light-colored dish will make the vibrant colors of the strawberries pop.
– Drizzle: For an extra special touch, drizzle some melted chocolate or a berry sauce over the top before serving. This will not only add flavor but also create an eye-catching design.
Conclusion
Chilly Strawberry Bliss Bars are not just a dessert; they are a celebration of flavor and creativity. With their vibrant strawberry layer, moist cake, and fluffy topping, these bars are bound to impress at any gathering. By following the detailed instructions and embracing the flexibility of the ingredients, you can create a delightful treat that caters to various dietary needs.
Whether enjoyed on a warm summer day or served at a festive occasion, these bliss bars are sure to be a hit, leaving everyone craving more. The combination of fresh strawberries and light whipped cream creates a refreshing dessert that is perfect for sharing. So gather your ingredients, follow the steps, and indulge in a batch of these delicious Chilly Strawberry Bliss Bars. You won’t be disappointed!


