
Crispy Oven-Baked Chicken Cutlets: A Delightful Family Favorite
There’s something undeniably comforting about the aroma of chicken cooking in the oven, especially when it’s crispy and golden brown. I remember the first time I made crispy oven-baked chicken cutlets for my family. It was a cool autumn evening, and I was looking for a cozy meal that would not only satisfy everyone’s hunger but also evoke a sense of warmth and love. As I plated the cutlets, I could see the anticipation in my children’s eyes, and when they took their first bite, their smiles said it all. This dish has since become a staple in our home, and I’m excited to share my recipe with you.
With a crunchy exterior and juicy interior, these chicken cutlets are perfect for a weeknight dinner or a weekend gathering. Plus, they’re baked instead of fried, which means you can enjoy them guilt-free! The recipe strikes a balance between healthiness and indulgence, making it an excellent choice for families looking to enjoy a satisfying meal without the extra calories associated with frying.
Gathering the Ingredients
Before we dive into the preparation, let’s take a look at what you’ll need to create these scrumptious crispy oven-baked chicken cutlets. While the ingredients are simple, they come together beautifully to elevate the flavor of the chicken.
– Chicken Breasts: You’ll need two large boneless, skinless chicken breasts. They are the star of the show, providing the protein and a tender base for the dish. Make sure to choose high-quality chicken for the best flavor.
– All-Purpose Flour: One cup of flour will be used for dredging, which creates a base that helps the egg and breadcrumbs adhere to the chicken. The flour acts as a barrier that allows the seasonings to stick while also absorbing moisture from the chicken.
– Eggs and Dijon Mustard: Two large eggs mixed with a tablespoon of Dijon mustard create a delicious and tangy batter that enhances the flavor and moisture of the chicken. This mixture not only adds richness but also helps the breadcrumb coating to adhere perfectly.
– Breadcrumbs: A cup of breadcrumbs, preferably panko, will give the cutlets an extra crunch. Panko breadcrumbs are lighter and crisp up beautifully in the oven, providing that satisfying crunch that is so desirable in fried foods, but without the unnecessary oil.
– Seasonings: We’ll use garlic powder, onion powder, smoked paprika, dried oregano, salt, and black pepper. These spices add depth and flavor to the cutlets, ensuring they don’t taste bland. Feel free to adjust the seasonings to suit your personal taste or experiment with different herbs and spices.
– Oil: A light spray of olive oil or a drizzle of vegetable oil helps achieve that golden crust. The oil not only contributes to the browning process but also enhances the overall flavor of the cutlets.
– Garnish: Optional, but fresh parsley or basil adds a lovely touch of color, while lemon wedges provide a zesty accent when serving. These garnishes not only brighten up the presentation but also add a fresh flavor that complements the savory cutlets.
Preparing the Chicken
Now that we have all our ingredients ready, it’s time to prepare the chicken. Start by preheating your oven to 400°F (200°C). This temperature is perfect for achieving a crispy exterior while keeping the chicken moist.
1. Prep the Chicken Breasts: Begin by placing the chicken breasts between two sheets of plastic wrap or parchment paper. Use a meat mallet or rolling pin to pound them to an even thickness of about half an inch. This step ensures that the chicken cooks evenly and remains juicy.
2. Set Up a Dredging Station: In one shallow dish, add the all-purpose flour, seasoned with a pinch of salt and pepper. In a second shallow bowl, whisk together the eggs and Dijon mustard until well combined. Finally, place the panko breadcrumbs in a third shallow dish, and feel free to mix in some of the spices you’ve chosen to give the breadcrumbs an extra flavor boost.
3. Coat the Chicken: Start by dredging each chicken breast in the flour, ensuring it’s fully coated. Shake off any excess flour, then dip it into the egg mixture, allowing any excess to drip off. Finally, press the chicken into the panko breadcrumbs, making sure to coat it thoroughly. This three-step process creates that irresistible crispy layer.
4. Prepare for Baking: Place the coated chicken cutlets on a baking sheet lined with parchment paper. To ensure a crispy texture, lightly spray the tops of the cutlets with olive oil. You can also drizzle a bit of oil around the chicken to promote even cooking.
5. Bake the Cutlets: Slide the baking sheet into your preheated oven and bake for about 20-25 minutes or until the chicken is cooked through and the cutlets are golden brown and crispy. To check for doneness, insert a meat thermometer into the thickest part of the chicken; it should read 165°F (74°C).
By following these initial steps, you’ll set the foundation for a delicious and satisfying meal. The crispy oven-baked chicken cutlets will not only bring a sense of comfort to your dining table but also provide a healthy alternative to traditional fried chicken. Keep an eye out for the next part of the recipe, where we’ll explore serving suggestions and tips for making this dish even more enjoyable!
{{image_2}}
Preparing the Chicken
To ensure even cooking, begin by preparing your chicken breasts. Place each chicken breast between two sheets of plastic wrap or wax paper. Using a meat mallet or rolling pin, gently pound the chicken to achieve an even thickness of about ½ inch. This technique is crucial as it not only helps the chicken cook uniformly but also keeps it tender and juicy. An even thickness allows for a consistent cooking time, preventing the thinner parts from drying out while the thicker parts finish cooking.
Setting Up Your Breading Stations
The key to perfectly breaded chicken cutlets lies in setting up an efficient breading station. A well-organized breading station will streamline the process, making it easier and more enjoyable. Prepare three shallow bowls:
1. First Bowl: Combine all-purpose flour with salt and pepper. This seasoned flour will create a flavorful base for your cutlets.
2. Second Bowl: In this bowl, whisk together the eggs and Dijon mustard until smooth. The mustard adds a subtle tang that enhances the flavor of the chicken while the egg acts as a binder for the breadcrumbs.
3. Third Bowl: For the final coating, mix panko breadcrumbs with garlic powder, onion powder, smoked paprika, dried oregano, salt, and black pepper. The panko breadcrumbs provide an extra crunch, while the spices impart a depth of flavor that elevates the dish.
This organized setup will make the breading process seamless. It’s essential to keep the bowls in close proximity to avoid cross-contamination and to maintain a smooth workflow.
Breading the Chicken
Now comes the fun part! Take one chicken breast and carefully coat it in the seasoned flour, ensuring an even layer while shaking off any excess flour. This step is crucial as it helps the egg mixture adhere better to the chicken.
Next, dip the chicken into the egg mixture, allowing any excess liquid to drip off back into the bowl. This step is vital because too much egg can make the breadcrumbs soggy, resulting in a less crispy finish.
Finally, dredge the chicken in the seasoned breadcrumbs, pressing lightly to ensure they adhere well to the surface. The goal is to cover each chicken breast completely with an even layer of breadcrumbs for that perfect crispy texture. Repeat this process with the second chicken breast.
Arranging and Baking the Cutlets
Once your chicken cutlets are breaded, it’s time to prepare them for baking. To prevent sticking and ensure even cooking, line a baking sheet with parchment paper or a silicone baking mat. This will also make for easy cleanup afterward.
Arrange the breaded chicken cutlets on the prepared sheet, leaving space between them for optimal air circulation. This spacing is essential; overcrowding the pan can trap steam and hinder that desired crispiness.
For an extra crunch, lightly spray or drizzle the cutlets with olive oil. This step not only enhances the flavor but also aids in achieving a golden-brown crust as they bake.
Transfer the baking sheet to the preheated oven set to 425°F (220°C) and bake for 20-25 minutes. Don’t forget to flip the cutlets halfway through the cooking time to ensure they develop a beautiful golden-brown crust on both sides. The chicken is done when it reaches an internal temperature of 165°F (74°C) and looks crispy and inviting.
Serving Suggestions
Once your chicken cutlets are finished baking, remove them from the oven and let them rest for a couple of minutes. This resting period allows the juices to redistribute throughout the meat, ensuring every bite is tender and juicy.
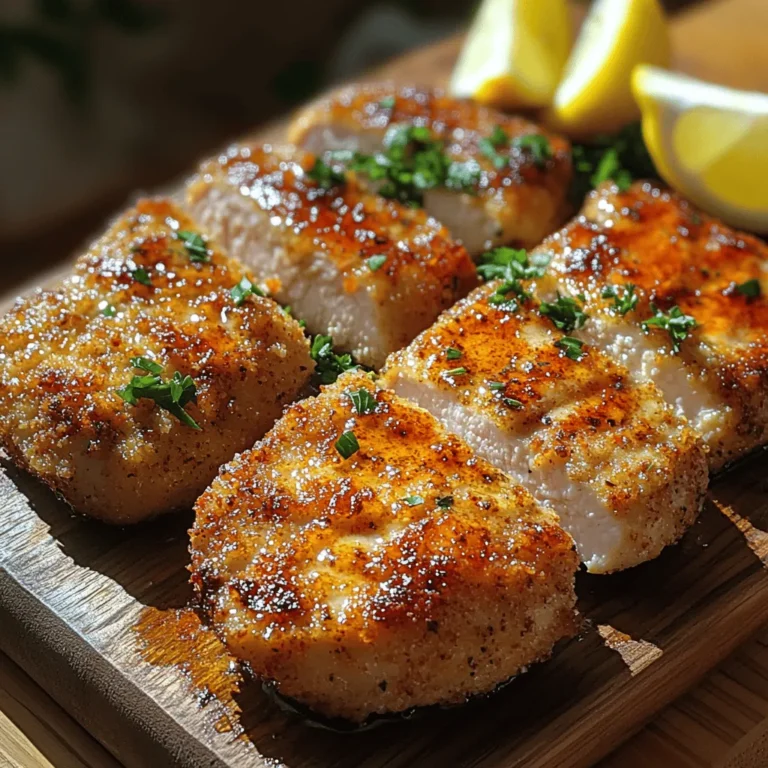
For an added touch of freshness and color, consider garnishing the cutlets with freshly chopped parsley or basil. This not only enhances the visual appeal but also adds a pop of flavor that complements the chicken beautifully.
Serve the crispy cutlets alongside lemon wedges for an added zesty squeeze just before enjoying. The acidity of the lemon pairs wonderfully with the richness of the chicken and can brighten the entire dish.
These chicken cutlets pair wonderfully with a variety of sides. Consider serving them with:
– Fresh Salad: A simple green salad with a light vinaigrette can provide a refreshing contrast to the crispy cutlets.
– Roasted Vegetables: Seasonal roasted vegetables, such as carrots, zucchini, or bell peppers, offer a nutritious and colorful addition to your plate.
– Mashed Potatoes or Rice: For a heartier meal, serve the cutlets over creamy mashed potatoes or fluffy rice, allowing the flavors to meld beautifully.
– Pasta: A side of pasta with a light garlic and olive oil sauce can also be a delightful pairing, creating a satisfying and balanced meal.
Tips for Best Results
Achieving the perfect crispy oven-baked chicken cutlets requires some attention to detail. Here are a few tips to ensure you get the best results every time:
1. Pound Evenly: Make sure the chicken breasts are pounded to an even thickness. This ensures they cook uniformly and prevents overcooking the thinner parts.
2. Use Fresh Ingredients: Fresh breadcrumbs, herbs, and spices can elevate the flavors of your chicken cutlets. If possible, avoid stale ingredients for the best taste.
3. Don’t Rush the Breading Process: Take your time when breading the chicken. Ensure each step is done thoroughly for the best adherence of the breadcrumbs.
4. Monitor the Bake: Ovens can vary in temperature, so keep an eye on your cutlets as they bake. Look for a deep golden color and an internal temperature of 165°F (74°C).
5. Experiment with Flavors: Feel free to adjust the seasoning in the breadcrumb mixture. Adding grated Parmesan cheese, Italian herbs, or even a touch of cayenne pepper can create a unique flavor profile.
Common Questions
Can I use chicken thighs instead of breasts?
Absolutely! Chicken thighs are juicier and can be used for this recipe. Just ensure they are boneless and skinless for the best results.
Can I make these cutlets gluten-free?
Yes, you can substitute the all-purpose flour with a gluten-free flour blend and use gluten-free breadcrumbs instead of panko.
How do I store leftovers?
Leftover chicken cutlets can be stored in an airtight container in the refrigerator for up to three days. Reheat them in the oven or an air fryer to maintain their crispiness.
Can I freeze the chicken cutlets?
Yes, you can freeze the breaded chicken cutlets before baking. Simply lay them flat on a baking sheet to freeze individually, then transfer them to a freezer-safe bag. When ready to cook, bake from frozen but add a few extra minutes to the cooking time.
Conclusion
Crispy oven-baked chicken cutlets are a wonderful and versatile dish that is sure to impress family and friends alike. With their golden crust and juicy interior, these cutlets are not only easy to prepare but also adaptable to various serving styles and flavor profiles. Whether enjoyed on their own or paired with delicious sides, they make for a satisfying meal that can fit any occasion.
So why not give this recipe a try? With the right techniques and a little bit of care, you can create chicken cutlets that are crispy on the outside and tender on the inside, making every bite a delightful experience. Enjoy your culinary adventure, and don’t forget to share your delicious results!
