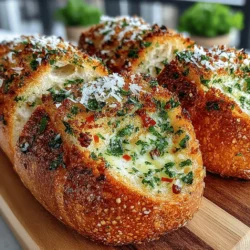

Crispy Herb-Infused Baked Garlic Bread: An Irresistible Side Dish
Garlic bread holds a beloved place on tables around the world, cherished for its simple yet flavorful profile. This versatile dish has gained immense popularity as both a side and an appetizer, often accompanying pasta dishes, salads, and soups. The warm, buttery aroma of garlic bread wafting from the oven is enough to make anyone’s mouth water. While store-bought versions are convenient, they often lack the freshness and custom flavors that homemade garlic bread can offer.
This recipe for Crispy Herb-Infused Baked Garlic Bread takes traditional garlic bread to an elevated level, combining the robust flavors of fresh herbs and garlic to create a dish that complements any meal. Not only is it easy to prepare, but it also allows you to customize the ingredients to suit your taste, ensuring that every bite is packed with freshness and flavor.
Understanding the Ingredients
To create the ultimate Crispy Herb-Infused Baked Garlic Bread, it’s crucial to understand the ingredients that make this dish stand out. The selection of bread, the quality of butter, the freshness of herbs, and even the choice of cheeses all contribute to the final outcome of this delicious side.
The Base: Choosing the Right Bread
The foundation of any great garlic bread lies in the choice of bread. The two most popular options are the French baguette and ciabatta loaf.
– French Baguette: Known for its crusty exterior and soft, airy interior, a French baguette is an excellent choice for garlic bread. Its texture allows for a satisfying crunch when baked, making it an ideal candidate for achieving that crispy finish. The flavor is mild, which lets the garlic and herbs take center stage.
– Ciabatta Loaf: With its rustic appearance and chewy texture, ciabatta offers a different dimension. The larger holes in the crumb allow for more butter and flavor absorption, resulting in a delightful combination of crispiness on the outside and a soft, buttery inside. Choosing between these two types of bread ultimately comes down to personal preference, but both deliver a delicious garlic bread experience.
The choice of bread not only affects the texture but also the overall flavor profile of the dish. A crustier bread will create a satisfying crunch, while a softer bread can provide a more indulgent experience.
Butter: The Secret to Richness
Next up is butter, a crucial ingredient that lends richness and depth to garlic bread. Unsalted butter is the recommended choice for this recipe, allowing you to control the saltiness and enhance the flavors of the other ingredients.
– Softened Butter: Using softened butter is key to achieving a spreadable mixture. This makes it easier to incorporate the garlic, herbs, and any additional seasonings. The creaminess of the butter not only helps to bind the ingredients but also contributes to the overall richness of the garlic bread.
Incorporating the right amount of butter is essential. Too little, and the bread may come out dry; too much, and it can become greasy. Striking the perfect balance can elevate the dish, making each bite a delightful experience.
The Stars of the Show: Fresh Herbs and Garlic
Garlic is undoubtedly the star of any garlic bread recipe, but fresh herbs play a crucial supporting role that can’t be overlooked.
– Fresh Herbs vs. Dried Herbs: While dried herbs can be convenient, nothing compares to the vibrant flavor of fresh herbs. Parsley, basil, and oregano are popular choices that can add a burst of freshness and complexity to the dish. Fresh herbs not only enhance the flavor but also add a pop of color, making your garlic bread visually appealing.
– The Role of Garlic: The amount of garlic used can be adjusted to suit your personal taste. More garlic will create a bolder flavor, while less will provide a subtler, more delicate touch. Roasting the garlic before adding it to the butter mixture can add a sweet, caramelized flavor that beautifully complements the herbs.
Spices and Seasoning
To further elevate the flavor of your Crispy Herb-Infused Baked Garlic Bread, consider incorporating spices and seasonings.
– Optional Ingredients: For those who enjoy a bit of heat, adding red pepper flakes can introduce a pleasant kick. Garlic powder can also enhance the garlic flavor, creating a more robust profile.
– Importance of Seasoning: Don’t forget to season your mixture with sea salt and freshly cracked black pepper. Proper seasoning is essential to make the flavors pop and ensure a well-rounded taste. The right amount of salt can enhance all the flavors, creating a delicious balance that will keep everyone coming back for more.
Adding Extra Flavor: Parmesan Cheese
Lastly, let’s talk about cheese. While garlic bread is often enjoyed in its simplest form, adding cheese can take it to a whole new level.
– Parmesan Cheese: The nutty and salty flavor of Parmesan cheese complements the garlic and herbs beautifully. Grating Parmesan and mixing it into the butter mixture can create a deliciously cheesy crust when baked.
– Exploring Alternatives: If you’re looking to experiment, consider using other cheeses, such as mozzarella for a gooey texture or cheddar for a sharper flavor. Each cheese will impart its unique character to the garlic bread, allowing for endless variations.
Step-by-Step Guide to Making Crispy Herb-Infused Baked Garlic Bread
Now that you have a solid understanding of the ingredients, it’s time to roll up your sleeves and start making your Crispy Herb-Infused Baked Garlic Bread. The first step in this culinary adventure is to prepare your oven and ingredients.
Prepping Your Oven and Ingredients
Before diving into the recipe, it’s essential to prepare your kitchen for success.
– Importance of Preheating the Oven: Preheating your oven to the right temperature ensures that your garlic bread bakes evenly and achieves that coveted crispy texture. A temperature of around 375°F to 400°F is ideal for producing a golden-brown crust without burning the garlic.
– Preparing the Bread: While the oven is preheating, take your chosen loaf of bread and slice it in half lengthwise. If you prefer smaller pieces, you can cut the loaf into individual servings. The goal is to create a surface area that will allow the butter and herb mixture to permeate the bread while still retaining its structure.
With your oven preheated and your bread sliced, you’re ready to move on to the next steps of mixing the ingredients and applying the flavorful herb-infused butter onto the bread, setting the stage for a delicious side that will enhance any meal.
Stay tuned for the next part of this recipe, where we will dive into creating the perfect herb-infused butter mixture and baking your garlic bread to crispy perfection.
{{image_2}}
Creating the Garlic Butter Mixture
To achieve the ultimate flavor in your Crispy Herb-Infused Baked Garlic Bread, the garlic butter mixture is crucial. Start with 1 cup (2 sticks) of unsalted butter, softened to room temperature. This allows for easy mixing and spreading. Add 5-6 cloves of minced garlic. The fresher the garlic, the more robust the flavor, so consider using a garlic press for a finer consistency.
Next, incorporate 2 tablespoons of finely chopped fresh parsley, 1 tablespoon of fresh rosemary, and 1 tablespoon of fresh thyme. These herbs not only infuse the butter with fragrance but also add a beautiful color contrast. You can adjust these amounts based on your taste preferences—more herbs can create a more vibrant flavor profile.
For a touch of brightness, squeeze in the juice of half a lemon and add a pinch of salt and pepper to taste. This will enhance the overall flavor and balance the richness of the butter. Mix these ingredients thoroughly in a medium-sized bowl until you achieve a smooth and homogenous garlic butter mixture.
Techniques for Ensuring Even Distribution of Garlic and Herbs
To ensure that the garlic and herbs are evenly distributed throughout the butter, consider using a spatula or a fork to blend the ingredients. Scrape the sides of the bowl frequently to incorporate any butter that may cling to the edges.
A handy tip is to let the garlic butter mixture sit for at least 15-30 minutes at room temperature. This resting period allows the flavors to meld, producing a more harmonious taste when spread on the bread.
Applying the Mixture Generously
Once your garlic butter is ready, it’s time to apply it generously to the bread. Slice 1 loaf of Italian or French bread in half lengthwise. It’s essential to ensure that the bread is fresh; stale bread will not absorb the mixture well and will result in a less desirable texture.
Using a spatula or a butter knife, spread the garlic butter mixture liberally over each half of the bread. Make sure to cover every nook and cranny; this is where the flavor lives! Don’t skimp on the butter; a generous layer will create that crispy, flavorful crust once baked.
How to Avoid Common Mistakes
A common mistake when preparing garlic bread is not using enough garlic butter. Remember, the goal is to achieve a rich, buttery, and aromatic flavor. Utilize the entire mixture, ensuring you do not leave any spots unbuttered. If you find that your butter is too thick, you can always warm it slightly to make spreading easier.
Baking Techniques for Perfect Texture
The baking method significantly impacts the texture of your garlic bread. For a crispy exterior and soft, flavorful interior, preheat your oven to 400°F (200°C).
You have two choices for baking: wrapping the bread in foil or baking uncovered. If you wrap the bread in foil, it will steam slightly, resulting in a softer texture. This can be beneficial if you prefer a softer garlic bread. However, for that crispy finish, bake the bread uncovered.
Timing and Temperature Tips
Bake the garlic bread for 10-12 minutes if you prefer a softer texture, flipping the halves halfway through. If you want a more pronounced crispy crust, bake it for 15-20 minutes. Keep an eye on it to prevent burning; every oven behaves differently.
For an extra crunch, you can place the bread under the broiler for an additional 1-2 minutes after baking. Just remember to watch it closely, as it can go from perfectly golden to burnt in seconds!
Final Steps: Cooling and Serving
Once your garlic bread is baked to perfection, remove it from the oven and let it cool for about 5 minutes before slicing. This cooling period allows the butter to reabsorb slightly into the bread, preventing it from becoming overly greasy when cut.
For presentation, slice the garlic bread into 1-inch pieces and arrange them on a serving platter. You can garnish with additional fresh herbs for a pop of color and flavor.
Pairing Suggestions
Complementing Your Garlic Bread
Crispy Herb-Infused Baked Garlic Bread is wonderfully versatile and pairs beautifully with a variety of dishes. It is a perfect accompaniment to hearty pastas, such as spaghetti bolognese or creamy alfredo, as it helps to soak up the delicious sauces.
For a lighter option, enjoy it alongside a fresh garden salad or a comforting soup, like tomato basil or minestrone. Garlic bread also makes an excellent appetizer, served with marinara sauce or hummus for dipping.
Wine and Beverage Pairings
When it comes to beverages, the right drink can elevate your garlic bread experience. A light, crisp white wine, such as Sauvignon Blanc or Pinot Grigio, complements the garlic and herb flavors beautifully. If you prefer red wine, a medium-bodied Chianti or Merlot can also work well, especially if you are serving it with pasta.
For a non-alcoholic option, consider pairing garlic bread with sparkling water or a refreshing lemon iced tea, which will cleanse the palate and enhance your meal.
Nutritional Information
Crispy Herb-Infused Baked Garlic Bread can be enjoyed guilt-free when made with wholesome ingredients. Each serving contains approximately 200-250 calories, depending on the amount of butter used.
In terms of nutritional value, garlic is known for its health benefits, including anti-inflammatory and immune-boosting properties. The fresh herbs add antioxidants and vitamins, making this dish a flavorful addition to your meal without compromising your health.
Discussion on Potential Adjustments for Dietary Preferences
For those seeking a vegan option, simply replace the unsalted butter with a plant-based alternative, such as vegan butter or olive oil. Ensure that the bread you are using is vegan-friendly, as some breads may contain dairy or eggs. You can still achieve a delicious flavor by following the same steps, and the result will be just as satisfying.
Conclusion
Crispy Herb-Infused Baked Garlic Bread is a delightful culinary experience that is both simple to make and immensely satisfying to eat. Its rich, buttery flavor combined with the aromatic herbs makes it a crowd-pleaser for a variety of occasions, from casual weeknight dinners to festive gatherings.
By following the outlined steps, you can create a perfect batch of garlic bread that will impress your family and friends. So, gather your ingredients and try making this delicious recipe at home. You’ll find that it’s not just a side dish; it’s an experience worth savoring!