Go Back
In recent years, charcuterie boards have taken the culinary world by storm, captivating food enthusiasts with their artistic displays of meats, cheeses, and accompaniments. These beautifully arranged platters are not only a feast for the eyes but also a versatile option for entertaining, offering a little something for everyone. Whether you're hosting a party, enjoying a cozy night in, or simply looking for a quick snack, charcuterie boards provide endless possibilities. However, as much as we adore the traditional spread, there's a delightful new trend on the horizon: charcuterie board wraps.

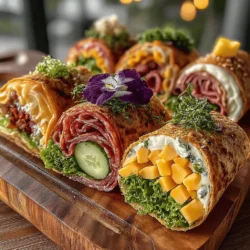
Charcuterie Board Wraps

Explore the delicious world of charcuterie board wraps—a fun and portable twist on the classic charcuterie board! These wraps combine all your favorite cured meats, cheeses, and fresh vegetables rolled into a flavorful tortilla or spinach wrap. Perfect for parties, meal prep, or a quick snack, they offer endless customization options. With simple ingredients and easy steps, you can create an impressive snack that everyone will love. Get creative and enjoy this delightful culinary experience!

Ingredients
  

4 large flour tortillas or spinach wraps

8 oz cream cheese, softened to room temperature

1 cup sliced deli meats (e.g., salami, prosciutto, turkey)

1 cup assorted cheeses, thinly sliced (e.g., cheddar, gouda, brie)

1 cup thinly sliced vegetables (e.g., cucumber, bell peppers, radishes)

½ cup chopped olives or pickles

¼ cup pesto or hummus (for spreading)

Fresh herbs for garnish (such as basil or arugula)

Optional: a handful of nuts or dried fruits for added crunch and sweetness

Instructions
 

Spread the Base: Start by laying one tortilla flat on a clean cutting board. Using a spatula, spread a generous layer of softened cream cheese evenly across the tortilla, leaving about a ½-inch border around the edges for easy rolling. If you want an extra flavor boost, add a light layer of pesto or hummus directly over the cream cheese.

    Layer the Fillings: Begin layering your fillings on top of the cream cheese. Start with an even distribution of the sliced deli meats, spreading them out so each bite will have a variety of flavors. Follow up with the assorted cheese slices, ensuring they cover most of the tortilla’s surface. Then, add a colorful mix of the thinly sliced vegetables for a refreshing crunch.

      Incorporate Extras: Evenly sprinkle chopped olives or pickles over the layered vegetables for a briny kick. If desired, add a handful of nuts or dried fruits in between the layers to introduce some texture and natural sweetness.

        Roll It Up: Starting from one edge of the tortilla, carefully begin rolling it away from you. Tuck in the fillings gently as you roll to maintain tension and ensure a tight wrap. Make sure to roll it snugly to keep the fillings securely inside. Once fully rolled, use a little cream cheese on the edge to seal the wrap closed.

          Slice and Serve: Place the rolled wrap seam side down on your cutting board. Using a sharp knife, slice the roll into bite-sized pieces, about 1-2 inches thick, for easy serving.

            Garnish: Arrange the sliced wraps on a large platter or cheese board. For an eye-catching presentation, garnish with fresh herbs and any leftover vegetables or fruits scattered around the wrap pieces.

              Chill and Enjoy: If you have time, chill the wraps in the refrigerator for about 30 minutes to allow them to firm up, which makes them easier to slice. Serve with extra pesto, hummus, or a savory dipping sauce on the side for added flavor.

                Prep Time: 20 minutes | Total Time: 30 minutes | Servings: 4-6

                  Presentation Tip: For an elegant touch, consider using a piece of parchment paper or a decorative serving board to display the wraps, and pair with a variety of colorful sides like sliced fruits, nuts, and your favorite dips.